Unleash full power of ECS 6 series motherboards. By completing update the latest BIOS, you can unlimitedly enjoy Intel 22nm CPU on ECS 6 series motherboards. Update to the newest without adjusting any hardware design. ECS provides the most convenient BIOS update application - CPU EVO. Within few clicks, a brand-new upgraded platform is at your service.
Please refer to following steps to complete BIOS update.
※ The following instructions are all based on Sandy Bridge CPU; after finishing all the steps below then your motherboard can support both Sandy Bridge CPU and Ivy Bridge CPU.
※ After updating this BIOS, you only can flash newer versions afterward. Please DO NOT flash back older version BIOS, it will cause your system to crash.
STEP1 Please download the application “CPU EVO” from the following location by models : (Last update : 08/23/2012)
Model Name
BIOS Version
Download
P67H2-A (V1.1)
10/26/2012
P67H2-A2 (V1.0)
12/07/2012
P67H2-A3 (V1.0)
05/24/2012
Model Name
BIOS Version
Download
H67H2-I (V1.1)
05/22/2012
H67H2-M (V1.1)
02/08/2013
H67H2-M2 (V1.0)
05/10/2012
H67H2-M3 (V1.0)
05/09/2012
Model Name
BIOS Version
Download
H61H2-A2 Deluxe (V1.0)
05/31/2012
H61H2-I2(V1.0)
03/06/2012
H61H2-M(V1.0)
03/06/2012
H61H2-M12(V1.0)
03/06/2012
H61H2-M13(V1.0)
03/05/2012
H61H2-M2(V1.0)
03/06/2012
H61H2-M3(V1.0)
03/06/2012
H61H2-M5(V1.0)
03/06/2012
H61H2-M6(V1.0)
03/05/2012
H61H2-M7(V1.0)
03/06/2012
H61H2-M9(V1.0)
03/06/2012
H61H-G11(V1.0)
05/22/2012
H61H-G11(V2.0)
07/09/2012
*Launching the application on hard disk instead of USB flash drive is highly recommended.
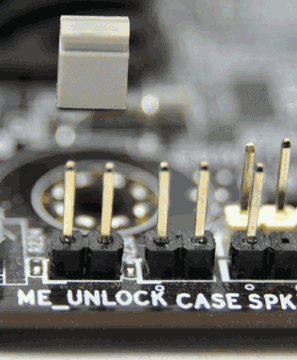
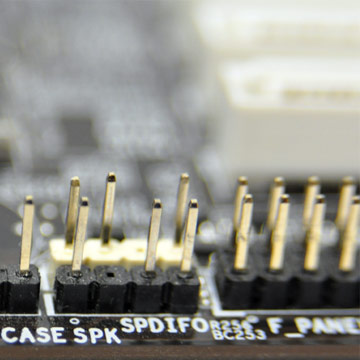
STEP 2 Turn off your PC, and then shut down the circuit with jumper.
After jumper shutdown, you can turn on your PC to continue updating BIOS. You can choose to update BIOS under DOS or Windows OS; we provide the following two operating processes for your reference.
STEP3 BIOS update under Windows OS: enter windows OS.
STEP3 BIOS update under DOS: enter DOS.
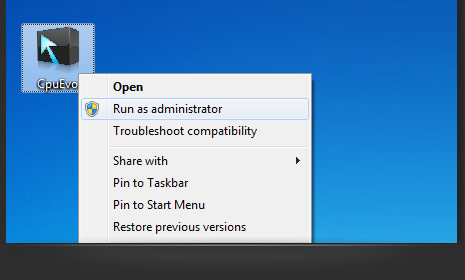
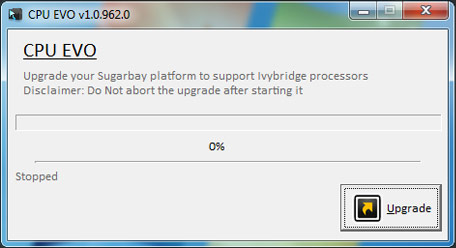
Right click the AP and ”Run as administrator”.
Make sure all other applications and your works are closed or saved, then press “Upgrade” button.
Do not abort the upgrade process or turn off the power while processing.
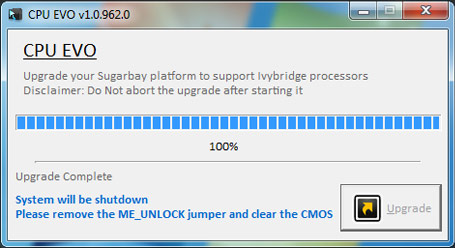
System will automatically shutdown after flashing the BIOS.
Enter the AP file name “cpuevo.exe” and press enter.
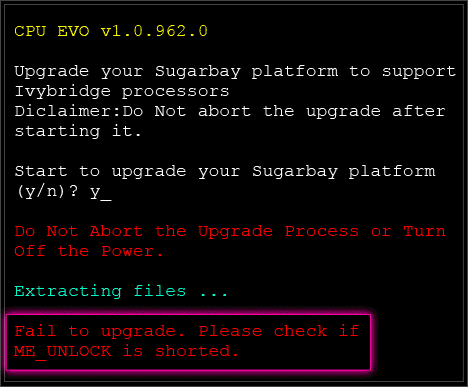
Enter “y” to start the upgrade process and do not abort the upgrade process or turn off the power while processing.
STEP 4 Remove the jumper after turning off the PC.
STEP 5
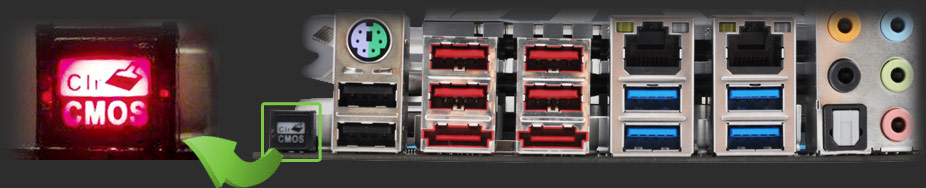
Clear CMOS. (Press clear CMOS button or move the jumper from the "normal" position to the "clear" position. Then place it back in the "normal" position again. It depends on your motherboard.)
Method A - Press clear CMOS button.
Method B - Move the jumper from the "normal" position to the "clear" position. Then place it back in the "normal" position again.
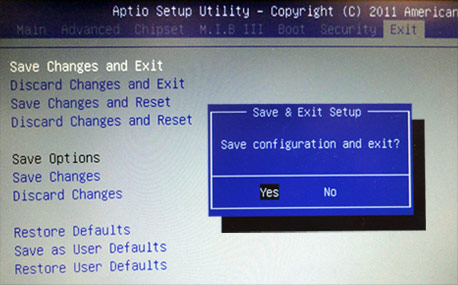
STEP 6 After reboot, the screen should display “CMOS Setting Wrong”. Now, Press F2 or DEL to enter BIOS setting page.
Exit > Restore Defaults > Save Changes and Exit
Chipset > ME Configuration
Check ME FW Version. The update is successfully completed as it shows 8.0.
STEP 7 Update the latest Intel Management Engine Components driver.
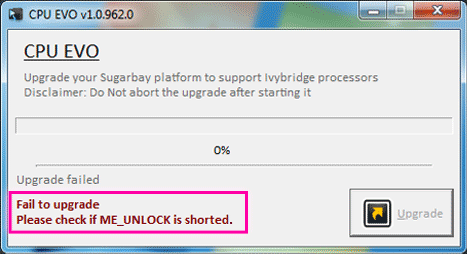
If the screen displays the message of “Fail to upgrade,” please refer to step 2 to check if the circuit is successfully shutdown.